Table of Contents
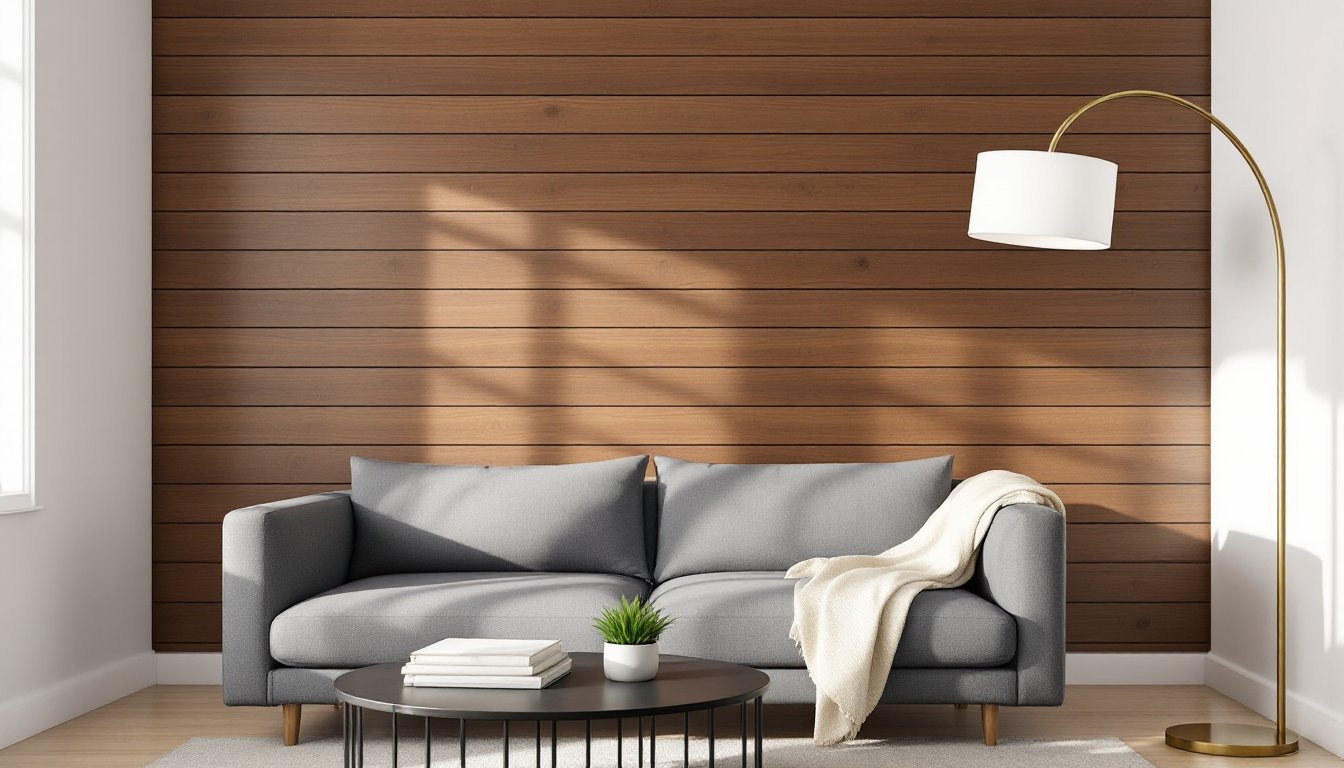
ToggleWood slat accent walls have become the go-to feature for homeowners looking to add depth, warmth, and architectural interest without tearing down walls or hiring a contractor. Unlike flat painted surfaces, slat walls create shadow lines that shift throughout the day, turning ordinary drywall into a focal point. They work in nearly any room, from bedrooms to home offices, and can be installed by a DIYer with basic carpentry skills. This guide covers horizontal, vertical, and mixed-material designs, plus practical guidance on materials, installation methods, and which rooms benefit most from the treatment.
Key Takeaways
- Wood slat accent walls add texture, depth, and architectural interest to any room while hiding imperfect drywall and providing subtle soundproofing benefits without major renovation costs.
- Horizontal wood slat designs visually widen spaces, while vertical slats emphasize ceiling height—choose based on your room’s proportions and desired visual effect.
- DIY slat walls cost $2–$5 per square foot but require tools and 6–8 hours for a 10-foot wall, whereas pre-fabricated panels cost $8–$15 per square foot but install in 2–4 hours with minimal skill required.
- Proper spacing, layout, and material selection are critical—use spacer jigs for consistent gaps, acclimate lumber for 48 hours before installation, and choose moisture-resistant materials like PVC or sealed wood in bathrooms.
- Wood slat accent walls work best in bedrooms, living rooms, home offices, and entryways, with design variations like staggered boards, integrated shelving, and LED backlighting offering customization for different design styles.
Why Wood Slat Accent Walls Are Trending in Modern Homes
Wood slat walls deliver what flat drywall can’t: texture, shadow, and dimensionality. The trend accelerated in 2024–2025 as homeowners moved away from minimalist white boxes and toward warmer, layered interiors. Slat walls fit both modern and transitional design styles, functioning as a neutral backdrop or a bold statement depending on wood species, stain choice, and spacing.
From a practical standpoint, slat walls hide imperfect drywall. If your wall has patches, texture mismatches, or minor dings, furring strips and slats cover them without the labor of skim-coating and sanding. They also add soundproofing, though not to the degree of dedicated acoustic panels, by breaking up sound waves and reducing echo in hard-surfaced rooms.
Installation is straightforward. Most designs use 1×2, 1×3, or 1×4 nominal lumber (actual dimensions: 3/4″ x 1.5″, 3/4″ x 2.5″, or 3/4″ x 3.5″) fastened to horizontal furring strips or directly to studs. The gaps between slats, typically 1″ to 3″, create the signature shadow lines. Painting slats and the wall behind them the same color produces a subtle, monochrome effect: contrasting colors or natural wood stains make the feature more dramatic.
Another reason for the surge: pre-fabricated slat panels. Companies now sell MDF or engineered wood panels with evenly spaced slats bonded to a backer board, cutting installation time from a full weekend to a few hours. These panels work well for renters or anyone prioritizing speed over customization.
Horizontal Wood Slat Accent Wall Designs
Horizontal slats visually widen a room, making them ideal for narrow bedrooms, hallways, or basement spaces. They echo shiplap and board-and-batten designs but with a modern, floating aesthetic.
Classic Even-Spaced Horizontal Slats
This is the foundational design: 1×3 or 1×4 boards mounted horizontally with uniform gaps. Start by installing vertical furring strips (1x2s work) at 16″ on center to hit wall studs. Snap a level chalk line for your first slat, fasten it with 18-gauge brad nails or 2″ finish screws, then use a spacer jig, cut from scrap plywood or MDF, to maintain consistent gaps as you work up the wall. Paint the slats and wall the same matte black or charcoal for a high-contrast, gallery-like effect.
Wide-Gap Floating Slat Wall
For a more open, airy look, space 1×2 slats 4″ to 6″ apart. This design works best when the wall behind is painted a contrasting color, think warm white slats over a deep navy or forest green wall. The wider spacing reduces material costs and installation time, but requires careful layout: mark slat positions on the furring strips before fastening to avoid cumulative spacing errors.
Staggered or Offset Horizontal Slats
Add visual interest by varying slat lengths. Cut boards to random lengths, some full-width, others stopping short, and stagger end points. This creates a broken, layered effect that draws the eye across the wall. It’s more time-intensive (each cut requires a miter saw or circular saw and careful measurement), but the result feels custom and intentional. Many woodworking project plans offer templates for staggered slat layouts.
Vertical Wood Slat Accent Wall Ideas
Vertical slats emphasize ceiling height, making them a smart choice for rooms with standard 8-foot ceilings or vaulted spaces where you want to draw the eye upward.
Floor-to-Ceiling Vertical Slats
Run 1×3 or 1×4 slats from baseboard to ceiling, fastening them to horizontal furring strips placed at the top, middle, and bottom of the wall. Use a 4-foot level or laser level to ensure slats stay plumb. This design works beautifully behind a bed, framing a fireplace, or flanking a TV wall. Natural wood tones, white oak, walnut, or cedar, pair well with mid-century modern and Scandinavian interiors.
Partial-Height Vertical Accent
For a less dramatic look, install slats only on the lower two-thirds of the wall, stopping at 60″ to 72″ height. Cap the top edge with a horizontal trim piece (a 1×4 works well) to create a clean transition. This approach is popular in dining rooms and entryways, where it mimics wainscoting but with a cleaner, contemporary profile.
Vertical Slats with Integrated Shelving
Combine function and form by running vertical slats around floating shelves. Mount two or three solid wood shelves (1×10 or 1×12 boards) to the wall using heavy-duty brackets or French cleats, then install slats in the negative space around them. The slats frame the shelves and create built-in storage for books, plants, or decor. This design is a favorite in home offices and living rooms.
Mixing Materials: Combining Wood Slats with Other Textures
Wood slats don’t have to stand alone. Pairing them with contrasting materials adds depth and breaks up visual monotony.
Wood Slats with Drywall Insets
Frame sections of the wall with slats, leaving recessed drywall panels in between. Paint the drywall a bold accent color, burnt orange, terracotta, or sage green, and keep the slats natural or stained dark. This grid-like composition works well in large living rooms or behind media consoles, where you want to zone the wall without adding bulk.
Slats Over Wallpaper or Fabric
Apply removable peel-and-stick wallpaper or stretched fabric to the wall, then layer horizontal or vertical slats on top. The pattern peeks through the gaps, adding complexity without overwhelming the room. Geometric or botanical patterns work best: avoid busy prints that compete with the slat lines.
Wood and Metal Hybrid Walls
Alternate wood slats with flat bar steel or aluminum strips for an industrial edge. This requires pre-drilling the metal to avoid bending, and fastening with screws rather than nails. The metal reflects light differently than wood, creating a dynamic interplay of matte and gloss. It’s a high-effort design, but impactful in modern lofts or home gyms. Builders often reference DIY furniture building guides for hybrid material joinery techniques.
Slats with Built-In LED Backlighting
Rout a shallow channel in the back of each slat or attach an LED strip to the furring strips before mounting slats. The light glows through the gaps, turning the wall into an ambient light source. Use warm white (2700K–3000K) LEDs for a cozy effect or RGB strips for color-changing options. This treatment is popular in bedrooms and media rooms but requires planning for wire routing and power supply placement.
Best Rooms for Wood Slat Accent Walls
Wood slat walls work nearly anywhere, but some rooms benefit more than others.
Bedrooms: The most common application. Install slats behind the bed to create a headboard effect without furniture. Horizontal slats widen small bedrooms: vertical slats add height to low-ceilinged spaces. Keep the color palette muted to avoid visual overstimulation.
Living Rooms: Slat walls anchor a seating area or frame a TV without the bulk of a full entertainment center. Pair them with floating shelves or a linear fireplace for a cohesive focal point. If your living room has a vaulted ceiling, run vertical slats to the peak to emphasize the architecture.
Home Offices: Slats add professionalism to Zoom backgrounds and reduce echo in hard-surfaced rooms. A partial-height slat wall behind a desk provides visual interest without competing with monitors or task lighting. Paint slats a dark charcoal or navy to minimize glare on video calls.
Bathrooms: Use moisture-resistant materials like PVC trim boards, cedar, or sealed hardwood. Install slats above a freestanding tub or behind a floating vanity. Ensure proper ventilation (exhaust fan rated for the room size) to prevent warping. Avoid raw MDF or particleboard, which swell when exposed to humidity.
Entryways and Hallways: Narrow spaces benefit from horizontal slats, which visually expand the width. Add hooks or pegs between slats for a functional mudroom feature. Hallways with no architectural interest gain dimension and warmth with a single slat accent wall.
Dining Rooms: Vertical slats behind a dining table mimic wainscoting but with a modern edge. They also provide a backdrop for artwork or a statement light fixture. For small dining areas, consider a partial-height installation to avoid overwhelming the space.
DIY vs. Pre-Made Wood Slat Panels: Which Is Right for You?
The choice between building a slat wall from scratch or buying pre-fabricated panels comes down to budget, skill level, and customization needs.
DIY Slat Walls
Pros:
- Full control over wood species, stain, spacing, and dimensions.
- Lower material cost: expect $2–$5 per square foot for lumber, fasteners, and furring strips.
- Satisfaction of a custom build.
Cons:
- Time-intensive. A 10-foot-wide wall can take 6–8 hours, including cutting, sanding, and finishing.
- Requires tools: miter saw or circular saw, drill, level, brad nailer (optional but recommended), and spacer jigs.
- Higher chance of spacing errors or uneven slats without careful layout.
Best for: DIYers comfortable with measuring, cutting, and fastening lumber. If you already own a miter saw and compressor, this is the most cost-effective route. Many beginner-friendly building guides walk through slat wall construction step-by-step.
Pre-Fabricated Slat Panels
Pros:
- Fast installation. Panels mount directly to the wall with adhesive or screws: most walls finish in 2–4 hours.
- Consistent spacing and alignment out of the box.
- Available in MDF, engineered wood, and PVC (for moisture-prone rooms).
Cons:
- Higher cost: $8–$15 per square foot, depending on material and finish.
- Limited customization. Most panels come in standard sizes (4’x8′ or 2’x4′) and fixed slat spacing.
- MDF panels require sealing or painting to prevent moisture damage.
Best for: Renters, first-time DIYers, or anyone prioritizing speed. Pre-made panels eliminate the risk of cutting errors and reduce tool requirements to a drill and level.
Material Considerations
Solid wood (pine, poplar, oak) offers the best finish but costs more and requires staining or painting. MDF is budget-friendly and paints beautifully but is heavy and vulnerable to moisture. PVC trim boards resist humidity and work well in bathrooms but lack the grain and warmth of real wood.
If you’re building from scratch, acclimate lumber in the room for 48 hours before installation. Wood expands and contracts with temperature and humidity changes: installing boards straight from a cold garage can lead to gaps or buckling once they adjust to indoor conditions.
Conclusion
Wood slat accent walls deliver high visual impact with manageable complexity, whether you’re cutting boards yourself or mounting pre-fabricated panels. Focus on precise layout, spacing errors compound quickly, and don’t skip prep work like wall patching and furring strip alignment. Choose materials suited to the room’s moisture level, and remember that most failures come from rushing measurements or skipping acclimation. A well-executed slat wall transforms a flat surface into a textured focal point that holds up for years.