Table of Contents
ToggleDesigning a small bathroom with a shower doesn’t mean sacrificing comfort or style. The right combination of layout, fixtures, and visual tricks can transform a cramped 5’×8′ space into a functional, inviting retreat. Whether you’re working with a vintage bungalow’s quirky floor plan or a modern condo’s compact footprint, the strategies below focus on real-world solutions that maximize every square inch. This guide covers shower enclosures, layouts, optical illusions, storage, fixtures, and budget-friendly upgrades, everything needed to tackle a small bathroom renovation with confidence.
Key Takeaways
- Frameless glass showers and sliding doors are the best small bathroom design solutions, creating visual space and freeing up 2–3 square feet compared to hinged doors.
- Smart layout strategies like pocket doors, wall-hung vanities, and corner sinks maximize floor area while maintaining IRC clearance requirements for functionality.
- Large-format tiles, light colors, and mirrors are optical illusions that make compact bathrooms feel significantly larger without structural changes.
- Recessed niches, floating vanities with shallow drawers, and wall-mounted storage solutions keep small bathroom design organized without protruding into usable space.
- Prioritize waterproofing and quality fixtures over cosmetic upgrades, as failing shower pans or improper slopes are expensive to repair and can cause mold damage.
- Budget-friendly updates like paint, hardware swaps, and tile refinishing deliver outsized visual impact for minimal cost before investing in full renovations.
Smart Shower Enclosure Solutions for Compact Bathrooms
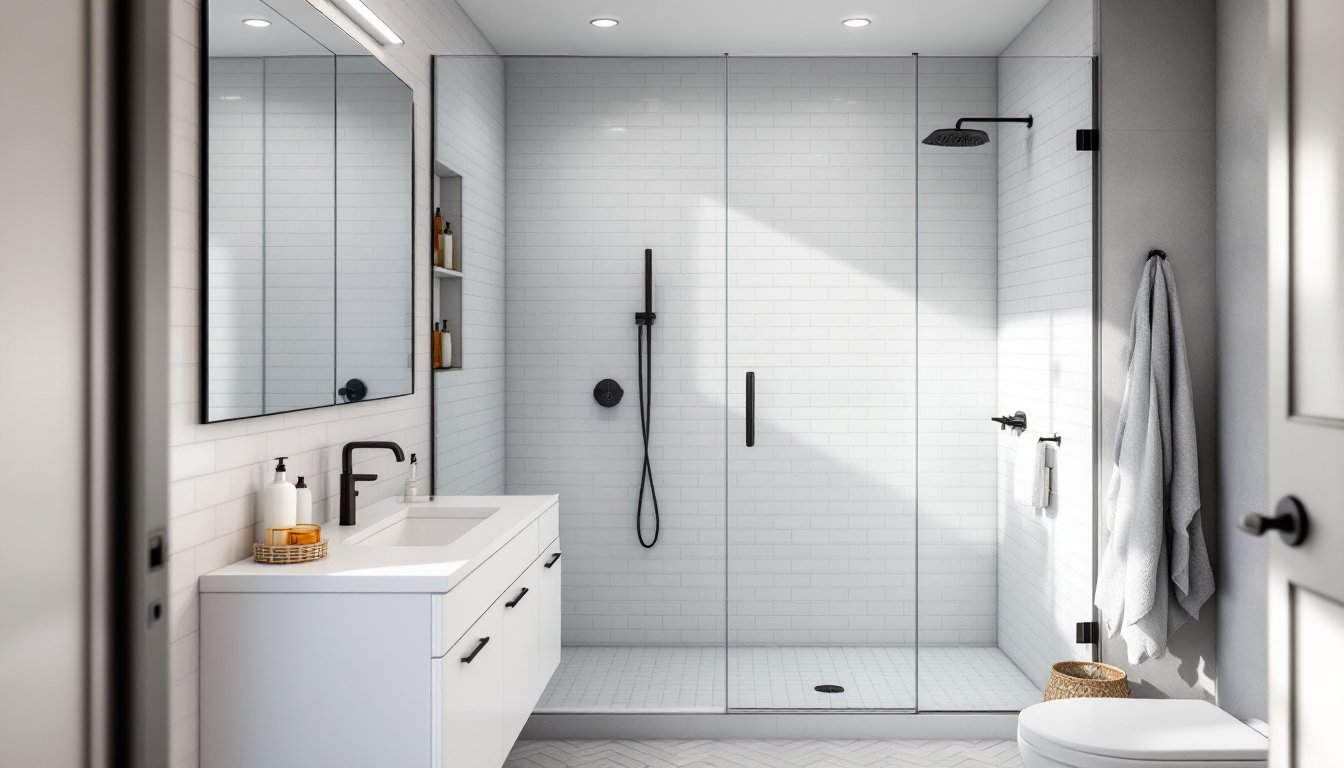
Frameless glass showers are the gold standard for small bathrooms. Without chunky metal frames, the clear panels create an uninterrupted sight line that makes the room feel larger. Expect to pay $800–$1,500 for a basic frameless enclosure, though prices vary by region and glass thickness (3/8″ is standard for residential).
If frameless isn’t in the budget, consider a semi-frameless or sliding door design. Sliding doors eliminate the swing radius required by hinged doors, freeing up 2–3 square feet of usable floor space. They work especially well in narrow bathrooms where a door swing would block the vanity or toilet.
For ultra-tight quarters, a curbless or low-profile shower pan paired with a single glass panel or half-wall creates a wet-room effect. This approach requires proper waterproofing, install a sloped mortar bed or prefab acrylic base, and use a linear drain along one wall to manage water flow. Note that curbless showers may need additional floor reinforcement and could require a permit depending on local codes.
Corner neo-angle showers (with angled glass and a five-sided base) fit snugly into corners and leave more open floor space than traditional square enclosures. Standard neo-angle bases range from 32″×32″ to 38″×38″, though 36″×36″ is the sweet spot for comfort without crowding.
Avoid heavy shower curtains on curved rods in truly small spaces, they billow inward and visually chop up the room. If you must use a curtain, choose a clear or light-colored liner and keep the rod as close to the ceiling as possible to draw the eye upward.
Space-Saving Layout Strategies That Actually Work
Start by measuring the minimum clearances required by the International Residential Code (IRC): 30″ of clear space in front of the toilet and sink, 24″ in front of the shower entry. In practice, overlapping these zones can save space, the shower door can swing into the toilet clearance area as long as the door doesn’t obstruct use.
A corner sink or wall-hung vanity eliminates the bulky cabinet base and opens up floor area. Wall-hung sinks require a 2×6 or 2×8 blocking installed between studs during framing to support the mounting brackets. If you’re retrofitting an existing wall, locate studs or add blocking accessible through an access panel.
Pocket doors are a game-changer. A standard 24″–30″ hinged bathroom door claims a 2’×3′ swing arc: a pocket door slides into the wall cavity, reclaiming that space entirely. Installation requires a pocket door frame kit (around $150–$250) and enough open wall cavity, avoid walls with plumbing or electrical runs unless you’re willing to reroute them (which often requires a plumber or electrician).
Consider rotating the layout entirely. Swapping the shower and toilet positions or moving the vanity to a different wall might yield better traffic flow. Sketch multiple configurations on graph paper (¼” = 1′ scale) before demolition. Many design professionals on platforms offer virtual consultations that can help identify non-obvious layout wins.
For shared or kids’ bathrooms, a tub-shower combo with a hinged glass panel conserves space versus separate fixtures. Choose a 60″ alcove tub (standard residential size) and tile the surround to the ceiling for a cohesive, easy-clean surface.
Optical Illusions: Design Tricks to Make Your Bathroom Feel Bigger
Large-format tiles (12″×24″ or bigger) reduce grout lines and create a cleaner, more expansive look. On floors, run tiles diagonally or in a herringbone pattern to add visual interest without busy-ness. For walls, vertical subway tile in a stacked bond (rather than traditional offset) draws the eye upward, making ceilings feel taller.
Light colors reflect more light, but don’t default to stark white everywhere. Soft grays, warm beiges, or pale blues feel less clinical and still keep the space airy. Reserve pure white for trim, ceilings, and grout to maximize contrast and brightness.
Monochromatic color schemes, using varying shades of one hue, eliminate visual breaks that make small rooms feel chopped up. For example, pair light gray walls with charcoal floor tiles and medium gray vanity cabinets. The result is cohesive and calming.
Mirrors are the easiest optical trick. Mount a large frameless mirror above the vanity, or go floor-to-ceiling on one wall. A mirrored medicine cabinet provides storage without sacrificing reflective surface. Avoid small, decorative mirrors scattered around, they fragment the space.
Continuous flooring from the main bathroom into the shower (using the same tile with no curb) blurs boundaries and expands perceived square footage. Pair this with modern terrazzo or seamless surfaces to enhance the effect.
Install recessed lighting instead of bulky ceiling fixtures. A combination of overhead recessed cans and a backlit mirror eliminates shadows and keeps the ceiling plane clean. Aim for 50–75 lumens per square foot in task areas (vanity, shower) and 20–30 lumens per square foot for ambient light.
Storage Solutions That Don’t Sacrifice Style
Recessed niches are the cleanest storage option. Frame a niche between studs (14.5″ wide for standard 16″ on-center framing, or 22.5″ for 24″ on-center) and tile the interior to match the shower walls. A single vertical niche (12″×36″) holds shampoo, soap, and razors without protruding into the shower footprint.
For vanities, choose a wall-mounted or floating design with open shelving below or shallow drawers. Deep drawers waste space in small bathrooms, opt for 4″–6″ drawer heights to organize makeup, toiletries, and cleaning supplies efficiently. Soft-close hardware costs an extra $3–$5 per drawer but prevents slamming in tight quarters.
Over-toilet storage (an open shelf unit or wall-mounted cabinet) uses vertical space that would otherwise go to waste. Install shelves at least 12″ above the toilet tank to allow clearance for the lid and seat. Avoid freestanding units that wobble, anchor shelves directly to studs with 3″ wood screws.
Medicine cabinets with built-in outlets inside the door keep countertops clear of charging toothbrushes and razors. Surface-mount cabinets install in minutes: recessed models require cutting into the wall between studs (easier during a gut renovation).
Towel hooks take up less wall space than towel bars and are easier to use in cramped layouts. Mount them 48″–54″ above the floor for adult use, or lower for kids’ bathrooms. Avoid suction-cup hooks, they fail in humid environments. Use proper wall anchors rated for 10–15 lbs each.
For inspiration on integrating storage with minimalist aesthetics, browse small-space galleries that showcase real homes with clever built-ins and DIY hacks.
Choosing the Right Fixtures and Features for Small Spaces
Compact toilets are specifically designed for tight bathrooms. A standard toilet has a 28″–30″ depth (from wall to front of bowl): compact or round-bowl models measure 25″–28″, saving 2″–5″ of precious floor space. Wall-hung toilets with in-wall tanks (like Geberit or Toto systems) eliminate the tank footprint entirely, though installation requires opening the wall and installing a carrier frame, not a trivial DIY unless you’re comfortable with plumbing and framing.
Low-flow showerheads (2.0 gpm or less) meet WaterSense standards and reduce water heating costs without sacrificing pressure. Pair with a thermostatic mixing valve to maintain consistent temperature and prevent scalding, especially important in households with kids or elderly occupants.
Choose a single-handle faucet for the vanity. Single-handle designs require less counter space than widespread faucets and are easier to operate with wet or soapy hands. Ensure the spout height and reach fit your sink, measure before ordering to avoid returns.
Ventilation is non-negotiable. The IRC requires an exhaust fan rated for the room’s cubic footage (CFM = cubic feet / 7.5 for bathrooms). A 5’×8′ bathroom with an 8′ ceiling needs roughly 43 CFM minimum. Choose a fan with a sone rating of 1.0 or lower for near-silent operation, cheap builder-grade fans at 3–4 sones sound like jet engines.
For lighting, damp-rated or wet-rated fixtures are required in shower zones (check the NEC for specifics). LED recessed cans with airtight IC housings prevent moisture intrusion into insulation and reduce energy costs. Install a dimmer switch to adjust lighting for late-night use without the full glare.
Budget-Friendly Renovation Tips for Maximum Impact
Paint and updated hardware deliver outsized returns for minimal cost. Swap dated brass or chrome faucets, drawer pulls, and towel bars for matte black or brushed nickel finishes ($50–$150 total). Use high-gloss or semi-gloss paint on walls and trim, it reflects light and wipes clean, critical in humid bathrooms. One gallon covers roughly 350–400 square feet: a typical small bathroom needs less than a gallon.
If existing tile is sound but outdated, refinish or paint it instead of replacing it. Specialty tile paints (like Rust-Oleum Tub & Tile) bond to ceramic and porcelain with proper prep, clean with TSP, sand lightly with 220-grit, and apply two thin coats. It won’t last as long as new tile, but it can buy 3–5 years before a full remodel.
DIY the demo to save on labor. Ripping out old tile, fixtures, and vanities is dusty and tedious, but it doesn’t require a contractor. Wear safety goggles, gloves, and a respirator rated N95 or better, older homes may have asbestos in mastic or drywall compound. If you suspect asbestos, stop and hire a certified abatement contractor.
Shop contractor supply houses or salvage yards for fixtures and materials. Floor models, discontinued colors, and overstock tile often sell at 30–50% off retail. Bring exact measurements and be flexible on finishes.
Prioritize the wet areas. If funds are tight, invest in waterproofing (RedGard or Kerdi membrane), quality tile, and a good shower pan or liner. Skimp on decorative accessories or fancy mirrors, not on the structural elements that prevent mold and water damage. A failed shower pan or improper slope can cost thousands to repair later.
Permit costs vary widely by jurisdiction, $50–$500 is typical for bathroom remodels. Skipping permits might save money upfront, but it can complicate insurance claims or home sales. If you’re moving plumbing, electrical, or structural elements (like removing a wall), pull permits and get inspections.
Conclusion
Small bathrooms demand thoughtful planning, but they don’t require a massive budget or professional help for every step. Focus on the fundamentals, smart layouts, quality waterproofing, and fixtures sized for the space, and layer in optical tricks and storage as budget allows. Measure twice, prep surfaces properly, and don’t skip ventilation or safety gear. With these strategies, even a 40-square-foot bathroom can feel functional, stylish, and significantly larger than its footprint suggests.